Building your first Gleam web app with Wisp and Lustre

There are many parts to implement when building a web app, such as routing, error handling, handling cookies, passing data across multiple pages, and the list goes on and on.
If you are new to building web apps in Gleam, you will not know where to start and what to use for each part. In this article, I’m going to guide you through that by building a simple todo app.
What are we going to build?
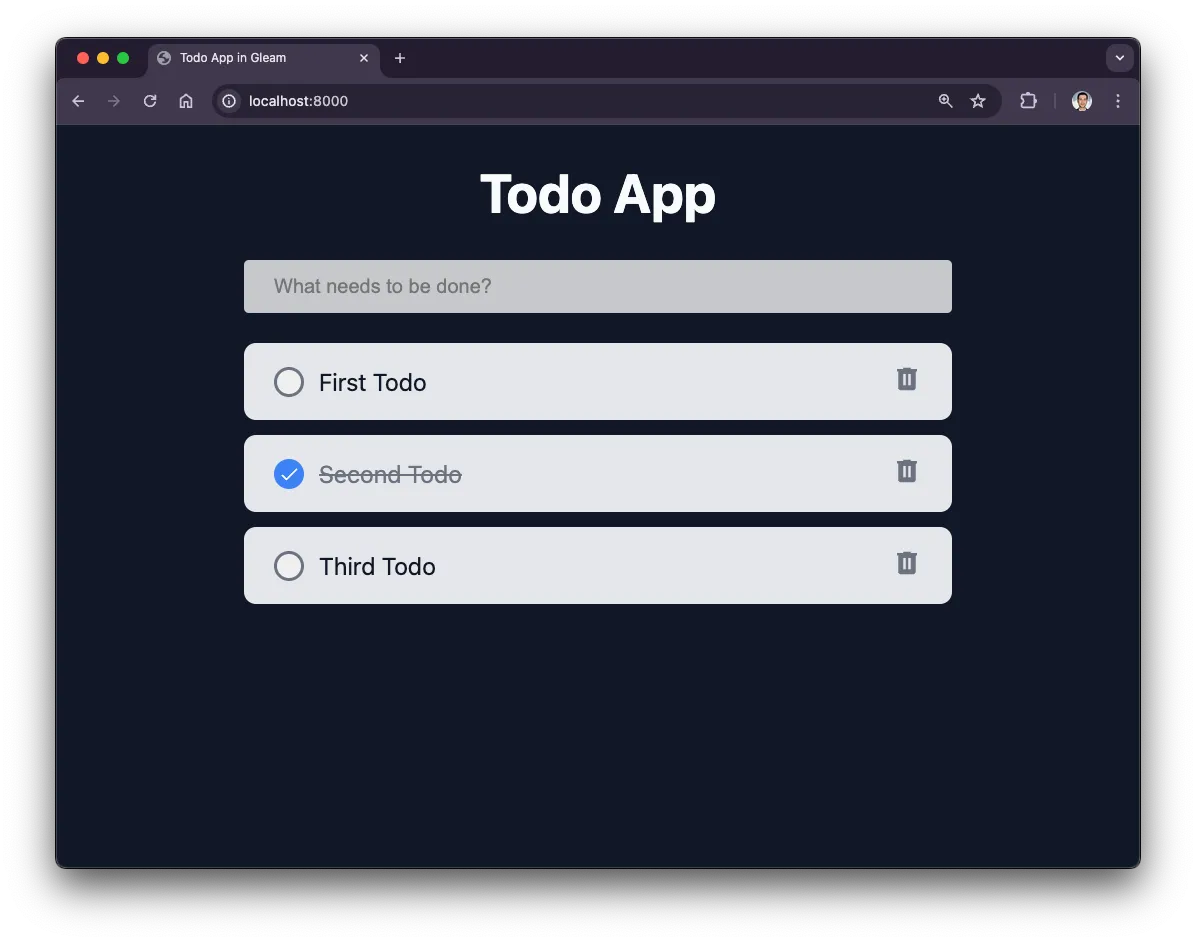
To focus on the concepts, we will build a simple todo app that everyone knows how it works. Here’s a screenshot of how it will look.
You can also get the full code on GitHub.
We have lots to cover in this article. Let’s dive in.
Create a new project
Let’s create a new gleam project and call it app.
gleam new app
In this app, we need to install the following packages:
- wisp: a Gleam web framework built by Louis Pilfold, the creator of the Gleam language.
- lustre: the most popular frontend framework in Gleam. In this example, we’ll use it to render simple HTML elements.
- mist: a Gleam web server that we’ll use to run a new http web server on a specific port.
- gleam_http: we will use it to use some HTTP types in the code, like GET, POST, DELETE, etc.
- gleam_erlang: we will use it only to call
sleep_forever()to suspend the main process after we start the web server. - dot_env: we will use it to read values from the .env file.
- gleam_json: we will use it to encode and decode json data in the app.
I’ll explain how to use them later, but for now let’s install them by running this:
gleam add wisp@1.1 lustre@4.3.6 mist@2.0 gleam_http@3.6 gleam_erlang@0.25 dot_env@1.1 gleam_json@1.0
Start a web server
Open src/app.gleam, and update it like this:
import gleam/erlang/process
import mist
import wisp
import wisp/wisp_mist

pub fn main() {
  wisp.configure_logger()

  let assert Ok(_) =
    wisp_mist.handler(fn(_) { todo }, "secret_key")
    |> mist.new
    |> mist.port(8000)
    |> mist.start_http

  process.sleep_forever()
}
A few things going on here, so let’s break it down.
wisp.configure_logger()
This is used to configure the wisp logger, which is needed to see logged messages formatted nicely. For example, when you get an error, you can see the error message displayed in your terminal, formatted with colors.
After that we run the server with this:
let assert Ok(_) =
  wisp_mist.handler(fn(_) { todo }, "secret_key")
  |> mist.new
  |> mist.port(8000)
  |> mist.start_http
The first argument of wisp_mist.handler is the request handler. For now, I’m just marking it as todo, but later we will use our router.
The second argument is the secret key that we will use to sign cookies and other sensitive data. For now, I’m hardcoding it directly in the code. A little bit later, we will move it to a .env file.
Then, we pipe that function to mist to start a new web server on port 8000. That’s the only time we will use mist in this app.
Below that, we suspend the main process to keep the web server running.
process.sleep_forever()
If you run the app now using gleam run, you will see that the server is working and the page localhost:8000 is served with an error message: “Internal Server Error”, which is expected.
Move secret key to .env
We will use the package dotenv for that.
First, create .env in the project’s root directory, and put this into it.
SECRET_KEY_BASE="test-secret-key"
Now, update app.gleam to use it.
import dot_env
import dot_env/env
import gleam/erlang/process
import mist
import wisp
import wisp/wisp_mist

pub fn main() {
  wisp.configure_logger()

  dot_env.new()
  |> dot_env.set_path(".env")
  |> dot_env.set_debug(False)
  |> dot_env.load

  let assert Ok(secret_key_base) = env.get_string("SECRET_KEY_BASE")

  let assert Ok(_) =
    wisp_mist.handler(fn(_) { todo }, secret_key_base)
    |> mist.new
    |> mist.port(8000)
    |> mist.start_http
  process.sleep_forever()
}
Add context type
Sometimes, we need to share some data across requests to make them easy to access. These data are like database connections, user sessions, or even some custom data, like a list of values.
The best place to store this data is in a context record. To use that, we need to first create a type for it.
Let’s create it in a new file in src/app/ called web.gleam. In this file, we’ll add things like shared middlewares and global types.
Add this to it:
pub type Context {
  Context(static_directory: String, items: List(String))
}
In this record, we will store two things: the static directory path, and a list of todo items. For now, items are just strings, but later we will create our own item type.
Let’s go back to src/app.gleam and create a new context.
import app/web.{Context}
import dot_env
import dot_env/env
import gleam/erlang/process
import mist
import wisp
import wisp/wisp_mist

pub fn main() {
  wisp.configure_logger()

  dot_env.new()
  |> dot_env.set_path(".env")
  |> dot_env.set_debug(False)
  |> dot_env.load

  let assert Ok(secret_key_base) = env.get_string("SECRET_KEY_BASE")

  let ctx = Context(static_directory: "", items: [])

  let assert Ok(_) =
    wisp_mist.handler(fn(_) { todo }, secret_key_base)
    |> mist.new
    |> mist.port(8000)
    |> mist.start_http
  process.sleep_forever()
}
We created a new context record, but we’re not using it anywhere. We’ll do that in a little bit. But first, let’s see what the static_directory should be.
Configure the static directory path
In Wisp, all non-gleam files should live under a directory named priv. In this directory, we can put all the static files, like CSS, JavaScript, images, etc.
So, let’s create that directory in the project’s root directory. And inside of it, create another directory called static.
After that, we need to specify it in the static_directory field in the Context record. So, you can just replace the empty string with "priv/static", or you can be extra safe and use wisp.priv_directory() to resolve the path.
import app/web.{Context}
import dot_env
import dot_env/env
import gleam/erlang/process
import mist
import wisp
import wisp/wisp_mist

pub fn main() {
  wisp.configure_logger()

  dot_env.new()
  |> dot_env.set_path(".env")
  |> dot_env.set_debug(False)
  |> dot_env.load

  let assert Ok(secret_key_base) = env.get_string("SECRET_KEY_BASE")

  let ctx = Context(static_directory: static_directory(), items: [])

  let assert Ok(_) =
    wisp_mist.handler(fn(_) { todo }, secret_key_base)
    |> mist.new
    |> mist.port(8000)
    |> mist.start_http

  process.sleep_forever()
}

fn static_directory() {
  let assert Ok(priv_directory) = wisp.priv_directory("app")
  priv_directory <> "/static"
}
Next, let’s add the request handler.
Add the request handler
You can handle all the requests in a single function, which we call the request handler. But as the app grows, it will be difficult to maintain; so it’s better to split it into multiple functions. In other words, we will treat the request handler as an entry point.
This means we need to create a dedicated file to put all of this into. We will call it the router.
Create that in src/app/router.gleam, and put the following into it.
import app/web.{type Context}
import gleam/string_builder
import wisp.{type Request, type Response}

pub fn handle_request(req: Request, ctx: Context) -> Response {
  wisp.html_response(string_builder.from_string("Hello, World!"), 200)
}
So, a request handler is just a function that takes the request record and any other extra data like the context, and returns a response.
The response for this handler is just returning “Hello, World!” with 200 status code.
Now, let’s go back to src/app.gleam to use it.
import app/router
import app/web.{Context}
import dot_env
import dot_env/env
import gleam/erlang/process
import mist
import wisp
import wisp/wisp_mist

pub fn main() {
  wisp.configure_logger()

  dot_env.new()
  |> dot_env.set_path(".env")
  |> dot_env.set_debug(False)
  |> dot_env.load

  let assert Ok(secret_key_base) = env.get_string("SECRET_KEY_BASE")

  let ctx = Context(static_directory: static_directory(), items: [])

  let handler = router.handle_request(_, ctx)

  let assert Ok(_) =
    wisp_mist.handler(handler, secret_key_base)
    |> mist.new
    |> mist.port(8000)
    |> mist.start_http
  process.sleep_forever()
}

// ...
Now if you run the app, you should see “Hello, World!“.
The global middleware
Before each request is handled, there are a few steps the request needs to go through first. These steps are like serving static files, logging requests, etc.
The best place to do that is in a middleware. A middleware is similar to a request handler; it takes a request and returns a response. The difference is that it takes a function as the last argument that contains code executed in a request handler or another middleware.
The basic goal of middlewares is reusability; you define them once, and then you can use them multiple times, even across different projects.
Since we will define a global middleware for all requests, a good place to add it is src/app/web.gleam.
import wisp

pub type Context {
  Context(static_directory: String, items: List(String))
}

pub fn middleware(
  req: wisp.Request,
  ctx: Context,
  handle_request: fn(wisp.Request) -> wisp.Response,
) -> wisp.Response {
  let req = wisp.method_override(req)
  use <- wisp.serve_static(req, under: "/static", from: ctx.static_directory)
  use <- wisp.log_request(req)
  use <- wisp.rescue_crashes
  use req <- wisp.handle_head(req)

  handle_request(req)
}
Let’s see what each line is doing.
let req = wisp.method_override(req)
Browsers only support GET and POST requests. Adding this allows us to use other request methods like DELETE, PUT, and PATCH.
This middleware overrides POST requests with what the request specifies in the _method query parameter. For example, if you send a POST request as /users/1?_method=DELETE, Wisp will route this request to a DELETE endpoint instead of POST.
Next one is for serving static assets:
use <- wisp.serve_static(req, under: "/static", from: ctx.static_directory)
In this example, we are serving static files under the /static URI path from the ctx.static_directory that we specified earlier. For example, you can access an image by http://localhost:8000/static/images/your-image.png.
Next, we log the incoming requests using this:
use <- wisp.log_request(req)
After that, we ensure that rather than crashing the app, we return an empty response with status code 500:
use <- wisp.rescue_crashes
The last one is for handling HEAD requests by converting them to GET requests:
use req <- wisp.handle_head(req)
After calling all the nested middlewares, we continue executing the request handler by calling it with the request:
handle_request(req)
Default responses
In any typical web app, we need to define the default behavior for some errors. For example, displaying a “Not Found” page when we get a 404 status code.
We can add these default responses in the global middleware.
import gleam/bool
import gleam/string_builder
import wisp

pub type Context {
  Context(static_directory: String, items: List(String))
}

pub fn middleware(
  req: wisp.Request,
  ctx: Context,
  handle_request: fn(wisp.Request) -> wisp.Response,
) -> wisp.Response {
  let req = wisp.method_override(req)
  use <- wisp.serve_static(req, under: "/static", from: ctx.static_directory)
  use <- wisp.log_request(req)
  use <- wisp.rescue_crashes
  use req <- wisp.handle_head(req)

  use <- default_responses

  handle_request(req)
}

// New code added 👇
pub fn default_responses(handle_request: fn() -> wisp.Response) -> wisp.Response {
  let response = handle_request()

  use <- bool.guard(when: response.body != wisp.Empty, return: response)

  case response.status {
    404 | 405 ->
      "<h1>Not Found</h1>"
      |> string_builder.from_string
      |> wisp.html_body(response, _)

    400 | 422 ->
      "<h1>Bad request</h1>"
      |> string_builder.from_string
      |> wisp.html_body(response, _)

    413 ->
      "<h1>Request entity too large</h1>"
      |> string_builder.from_string
      |> wisp.html_body(response, _)

    500 ->
      "<h1>Internal server error</h1>"
      |> string_builder.from_string
      |> wisp.html_body(response, _)

    _ -> response
  }
}
In default_responses(), we first call the request handler to execute the request in the router. If the request handler returns an empty response, then we continue to see what status code it returned.
For example, if our router returns 404 or 405 status codes, we respond with a “Not Found” page.
In this example, we’re just returning some simple HTML code. In real world apps, you will return a full page using your layout and design.
Using the global middleware
In the previous couple of sections, we’ve been creating the middleware, but we haven’t used it yet.
To use it, go to src/app/router.gleam, and put the following:
import app/web.{type Context}
import gleam/string_builder
import wisp.{type Request, type Response}

pub fn handle_request(req: Request, ctx: Context) -> Response {
  use _req <- web.middleware(req, ctx)
  wisp.html_response(string_builder.from_string("Hello, World!"), 200)
}
Adding that line alone, calls everything we’ve written in the middleware above.
Define routes
Defining routes in wisp simply means matching the path of the request.
For example, to match the path /foo/bar, you would write this:
case wisp.path_segments(req) {
  ["foo", "bar"] -> {
    // Your code
  }
  _ -> wisp.not_found()
}
For now, we’ll just define a route for the homepage and routes for empty responses (the default responses we’ve defined in the global middleware).
import app/web.{type Context}
import gleam/string_builder
import wisp.{type Request, type Response}

pub fn handle_request(req: Request, ctx: Context) -> Response {
  use _req <- web.middleware(req, ctx)

  case wisp.path_segments(req) {
    // Homepage
    [] -> {
      wisp.html_response(string_builder.from_string("Home"),  200)
    }

    // All the empty responses
    ["internal-server-error"] -> wisp.internal_server_error()
    ["unprocessable-entity"] -> wisp.unprocessable_entity()
    ["method-not-allowed"] -> wisp.method_not_allowed([])
    ["entity-too-large"] -> wisp.entity_too_large()
    ["bad-request"] -> wisp.bad_request()
    _ -> wisp.not_found()
  }
}
Format our HTML with Lustre
Up until now, all the HTML we’ve written is simple strings. When the project grows, it becomes impractical to keep writing it like this. Instead, we will use Lustre for formatting our HTML using its powerful set of functions for elements and attributes.
First, let’s define the layout of the page.
Create a new directory under src/app/ and call it pages. Inside it, create layout.gleam, and paste the following into it:
import lustre/attribute
import lustre/element.{type Element}
import lustre/element/html

pub fn layout(elements: List(Element(t))) -> Element(t) {
  html.html([], [
    html.head([], [
      html.title([], "Todo App in Gleam"),
      html.meta([
        attribute.name("viewport"),
        attribute.attribute("content", "width=device-width, initial-scale=1"),
      ]),
      html.link([attribute.rel("stylesheet"), attribute.href("/static/app.css")]),
    ]),
    html.body([], elements),
  ])
}
At first, it might look confusing, but it’s just a list of functions to create HTML elements.
For example, instead of writing this:
<h1 class="title">Hello, World!</h1>
We write it like this:
html.h1([class("title")], [text("Hello, World!")])
Most of Lustre’s functions follow the same format: the first argument is a list of attributes, and the second argument is a list of child elements, if applicable.
It’s still HTML, but written with a different syntax.
Of course, Lustre can do much more than that, but in this article, we’ll just use it for this purpose.
So, this layout function takes a list of elements in its argument and uses it in the body tag.
Add the homepage
Create a new file under src/app/pages/ and name it home.gleam. Now, add this to it:
import lustre/element.{type Element, text}
import lustre/element/html.{h1}

pub fn root() -> Element(t) {
  h1([], [text("Homepage")])
}
For now, this page just displays an h1 with the text “Homepage”. Later, we’ll update it to display the final markup for the todo app.
To make accessing pages code a little cleaner, let’s put them under a parent file called pages. Create src/app/pages.gleam and put this:
import app/pages/home

pub fn home() {
  home.root()
}
Next, let’s update the homepage route to display this page.
import app/pages
import app/pages/layout.{layout}
import app/web.{type Context}
import lustre/element
import wisp.{type Request, type Response}

pub fn handle_request(req: Request, ctx: Context) -> Response {
  use _req <- web.middleware(req, ctx)

  case wisp.path_segments(req) {
    // Homepage
    [] -> {
      [pages.home()]
      |> layout
      |> element.to_document_string_builder
      |> wisp.html_response(200)
    }

    // All the empty responses
    ["internal-server-error"] -> wisp.internal_server_error()
    ["unprocessable-entity"] -> wisp.unprocessable_entity()
    ["method-not-allowed"] -> wisp.method_not_allowed([])
    ["entity-too-large"] -> wisp.entity_too_large()
    ["bad-request"] -> wisp.bad_request()
    _ -> wisp.not_found()
  }
}
Define the Item type
Since this tutorial is not about modeling data using types, I won’t go into the details of how the Item type works. The name of the functions should be enough to understand what they are doing.
Create a new models directory under src/app. Add a new file called item.gleam, and put this into it:
import gleam/option.{type Option}
import wisp

pub type ItemStatus {
  Completed
  Uncompleted
}

pub type Item {
  Item(id: String, title: String, status: ItemStatus)
}

pub fn create_item(id: Option(String), title: String, completed: Bool) -> Item {
  let id = option.unwrap(id, wisp.random_string(64))
  case completed {
    True -> Item(id, title, status: Completed)
    False -> Item(id, title, status: Uncompleted)
  }
}

pub fn toggle_todo(item: Item) -> Item {
  let new_status = case item.status {
    Completed -> Uncompleted
    Uncompleted -> Completed
  }
  Item(..item, status: new_status)
}

pub fn item_status_to_bool(status: ItemStatus) -> Bool {
  case status {
    Completed -> True
    Uncompleted -> False
  }
}
What you need to know here is that each item record consists of three fields: id, title, and completed.
Use the Item type
Before we get into saving and fetching items, we can add the code for displaying them on the homepage.
But first let’s update the Context type to use it instead of a string. So, update this in src/app/web.gleam.
import app/models/item.{type Item}
import gleam/bool
import gleam/string_builder
import wisp

pub type Context {
  Context(static_directory: String, items: List(Item))
}

// ...
Next, we need to display the available list of items on the homepage, but before that, we need to pass them from the router.
Since we haven’t fetched todos yet, it will display an empty list for now.
Go to src/app/router.gleam, and pass the list of items that we have in the Context to the homepage function.
pub fn handle_request(req: Request, ctx: Context) -> Response {
  use _req <- web.middleware(req, ctx)

  case wisp.path_segments(req) {
    // Homepage
    [] -> {
      [pages.home(ctx.items)]
      |> layout
      |> element.to_document_string_builder
      |> wisp.html_response(200)
    }

// ...
Now, let’s add the needed parameter to the home functions in src/app/pages.gleam and src/app/pages/home.gleam like this:
// src/app/pages.gleam

import app/models/item.{type Item}
import app/pages/home

pub fn home(items: List(Item)) {
  home.root(items)
}
// src/app/pages/home.gleam

import app/models/item.{type Item}
import lustre/element.{type Element, text}
import lustre/element/html.{h1}

pub fn root(items: List(Item)) -> Element(t) {
  h1([], [text("Homepage")])
}
Now, it’s time to update the homepage markup to display the todos.
Since Lustre’s syntax is different from HTML, it might be confusing at first. But after all, it’s just HTML elements displaying the todos we have along with the needed forms and buttons.
Let’s update src/app/pages/home.gleam.
import app/models/item.{type Item, Completed, Uncompleted}
import gleam/list
import lustre/attribute.{autofocus, class, name, placeholder}
import lustre/element.{type Element, text}
import lustre/element/html.{button, div, form, h1, input, span, svg}
import lustre/element/svg

pub fn root(items: List(Item)) -> Element(t) {
  div([class("app")], [
    h1([class("app-title")], [text("Todo App")]),
    todos(items),
  ])
}

fn todos(items: List(Item)) -> Element(t) {
  div([class("todos")], [
    todos_input(),
    div([class("todos__inner")], [
      div(
        [class("todos__list")],
        items
          |> list.map(item),
      ),
      todos_empty(),
    ]),
  ])
}

fn todos_input() -> Element(t) {
  form(
    [
      class("add-todo-input"),
      attribute.method("POST"),
      attribute.action("/items/create"),
    ],
    [
      input([
        name("todo_title"),
        class("add-todo-input__input"),
        placeholder("What needs to be done?"),
        autofocus(True),
      ]),
    ],
  )
}

fn item(item: Item) -> Element(t) {
  let completed_class: String = {
    case item.status {
      Completed -> "todo--completed"
      Uncompleted -> ""
    }
  }
  div([class("todo " <> completed_class)], [
    div([class("todo__inner")], [
      form(
        [
          attribute.method("POST"),
          attribute.action("/items/" <> item.id <> "/completion?_method=PATCH"),
        ],
        [button([class("todo__button")], [svg_icon_checked()])],
      ),
      span([class("todo__title")], [text(item.title)]),
    ]),
    form(
      [
        attribute.method("POST"),
        attribute.action("/items/" <> item.id <> "?_method=DELETE"),
      ],
      [button([class("todo__delete")], [svg_icon_delete()])],
    ),
  ])
}

fn todos_empty() -> Element(t) {
  div([class("todos__empty")], [])
}

fn svg_icon_delete() -> Element(t) {
  svg(
    [class("todo__delete-icon"), attribute.attribute("viewBox", "0 0 24 24")],
    [
      svg.path([
        attribute.attribute("fill", "currentColor"),
        attribute.attribute(
          "d",
          "M9,3V4H4V6H5V19A2,2 0 0,0 7,21H17A2,2 0 0,0 19,19V6H20V4H15V3H9M9,8H11V17H9V8M13,8H15V17H13V8Z",
        ),
      ]),
    ],
  )
}

fn svg_icon_checked() -> Element(t) {
  svg(
    [class("todo__checked-icon"), attribute.attribute("viewBox", "0 0 24 24")],
    [
      svg.path([
        attribute.attribute("fill", "currentColor"),
        attribute.attribute(
          "d",
          "M21,7L9,19L3.5,13.5L4.91,12.09L9,16.17L19.59,5.59L21,7Z",
        ),
      ]),
    ],
  )
}
Add styling
If you open the homepage in your browser, you’ll notice that styling is still missing. Since this article is not about CSS, I’ll just give you the code to add it inside priv/static/app.css.
You can get the CSS code from GitHub.
Create todos middleware
To keep the code clean, I’ll add a middleware for loading the todos before each route.
To do that, create a new file named item_routes.gleam under a new directory src/app/routes/.
This middleware will update the items field in the context record.
Before we create it, let me show you how to use it in src/app/router.gleam.
import app/pages
import app/pages/layout.{layout}
import app/routes/item_routes.{items_middleware}
import app/web.{type Context, Context}
import gleam/http
import lustre/element
import wisp.{type Request, type Response}

pub fn handle_request(req: Request, ctx: Context) -> Response {
  use req <- web.middleware(req, ctx)
  use ctx <- items_middleware(req, ctx)

// ...
In src/app/routes/item_routes.gleam, we will create that middleware, and it will look like this:
pub fn items_middleware(
  req: Request,
  ctx: Context,
  handle_request: fn(Context) -> Response,
) {
  // It will update the context with the fetched items
  // and pass it to the handle_request, like
  // handle_request(new_context)
  todo
}
Fetching todos
For the sake of simplicity, we will use cookies for storing and retrieving items. In real-world apps, you would typically store them in a database or similar, but for now let’s keep things simple.
In Wisp, we can retrieve data from cookies using wisp.get_cookie, but before we write that, we need to consider the format of the stored todos. In situations where data must be stored as string, JSON is the best format.
The items will be stored like this in the cookies:
[
  { "id": "1", "title": "Title 1", "completed": true },
  { "id": "2", "title": "Title 2", "completed": false }
]
So, fetching items requires two steps: reading items as JSON from the cookies, then parsing them into Item records.
Explaining Gleam decoders is beyond the scope of this tutorial, but you need to know that we’ll use the Gleam’s decode3 with the gleam_json parser to convert the JSON into item records.
In my current implementation, I’m separating the concept of an item model and the parsed JSON, but they can be the same. This means, I need to create an intermediate type called ItemJson.
type ItemsJson {
  ItemsJson(id: String, title: String, completed: Bool)
}
Then, I’ll use that type to create the Item model that we have.
Now, let’s update the items_middleware like this:
import app/models/item.{type Item, create_item}
import app/web.{type Context, Context}
import gleam/dynamic
import gleam/json
import gleam/list
import gleam/option.{Some, None}
import wisp.{type Request, type Response}

type ItemsJson {
  ItemsJson(id: String, title: String, completed: Bool)
}

pub fn items_middleware(
  req: Request,
  ctx: Context,
  handle_request: fn(Context) -> Response,
) {
  let parsed_items = {
    case wisp.get_cookie(req, "items", wisp.PlainText) {
      Ok(json_string) -> {
        let decoder =
          dynamic.decode3(
            ItemsJson,
            dynamic.field("id", dynamic.string),
            dynamic.field("title", dynamic.string),
            dynamic.field("completed", dynamic.bool),
          )
          |> dynamic.list

        let result = json.decode(json_string, decoder)
        case result {
          Ok(items) -> items
          Error(_) -> []
        }
      }
      Error(_) -> []
    }
  }

  let items = create_items_from_json(parsed_items)

  let ctx = Context(..ctx, items: items)

  handle_request(ctx)
}

fn create_items_from_json(items: List(ItemsJson)) -> List(Item) {
  items
  |> list.map(fn(item) {
    let ItemsJson(id, title, completed) = item
    create_item(Some(id), title, completed)
  })
}
Add route for creating items
Add this route to router.gleam:
["items", "create"] -> {
  use <- wisp.require_method(req, http.Post)
  item_routes.post_create_item(req, ctx)
}
This is for handling POST requests sent to /items/create. The new thing here is the middleware wisp.require_method. This middleware is used to specify which method you want to handle for this request.
Below that, we’re calling item_routes.post_create_item. So let’s add it to our item_routes module.
import app/models/item.{type Item, create_item}
import app/web.{type Context, Context}
import gleam/dynamic
import gleam/json
import gleam/list
import gleam/option.{None, Some}
import gleam/result
import gleam/string
import wisp.{type Request, type Response}

// ...


pub fn post_create_item(req: Request, ctx: Context) {
  use form <- wisp.require_form(req)

  let current_items = ctx.items

  let result = {
    use item_title <- result.try(list.key_find(form.values, "todo_title"))
    let new_item = create_item(None, item_title, False)
    list.append(current_items, [new_item])
    |> todos_to_json
    |> Ok
  }

  case result {
    Ok(todos) -> {
      wisp.redirect("/")
      |> wisp.set_cookie(req, "items", todos, wisp.PlainText, 60 * 60 * 24)
    }
    Error(_) -> {
      wisp.bad_request()
    }
  }
}

fn todos_to_json(items: List(Item)) -> String {
  "["
  <> items
  |> list.map(item_to_json)
  |> string.join(",")
  <> "]"
}

fn item_to_json(item: Item) -> String {
  json.object([
    #("id", json.string(item.id)),
    #("title", json.string(item.title)),
    #("completed", json.bool(item.item_status_to_bool(item.status))),
  ])
  |> json.to_string
}
Most of the code should be understandable with a little bit of research on how the API of the used modules works, but one thing I want to draw your attention to is the wisp.require_form(req) middleware.
This middleware is used to extract form data from the request, whether the data is encoded using application/x-www-form-urlencoded or multipart/form-data.
Adding new items should work if you test your app in the browser.
Add route for deleting items
For the delete route, add this to router.gleam:
["items", id] -> {
  use <- wisp.require_method(req, http.Delete)
  item_routes.delete_item(req, ctx, id)
}
Note how we’re capturing the id in the URL by matching it with the id variable.
Now, let’s add the item_routes.delete_item function in item_routes.gleam.
pub fn delete_item(req: Request, ctx: Context, item_id: String) {
  let current_items = ctx.items

  let json_items = {
    list.filter(current_items, fn(item) { item.id != item_id })
    |> todos_to_json
  }
  wisp.redirect("/")
  |> wisp.set_cookie(req, "items", json_items, wisp.PlainText, 60 * 60 * 24)
}
And that’s it for the delete route.
Add item completion route
Next, we need to add a route for toggling the status of an item.
Add this to the router:
["items", id, "completion"] -> {
  use <- wisp.require_method(req, http.Patch)
  item_routes.patch_toggle_todo(req, ctx, id)
}
Then, add the patch_toggle_todo to item_routes module, like this:
pub fn patch_toggle_todo(req: Request, ctx: Context, item_id: String) {
  let current_items = ctx.items

  let result = {
    use _ <- result.try(
      list.find(current_items, fn(item) { item.id == item_id }),
    )
    list.map(current_items, fn(item) {
      case item.id == item_id {
        True -> item.toggle_todo(item)
        False -> item
      }
    })
    |> todos_to_json
    |> Ok
  }

  case result {
    Ok(json_items) ->
      wisp.redirect("/")
      |> wisp.set_cookie(req, "items", json_items, wisp.PlainText, 60 * 60 * 24)
    Error(_) -> wisp.bad_request()
  }
}
Now, toggling todos should work!
Wrap-up
Since this is the first app you’ve built in Gleam and Wisp, it might feel like a lot of work. However, it’ll actually become pretty straightforward once you do a little bit more work with it.
For the next steps, I encourage you to check the Wisp docs if you haven’t already. Reading the examples in it will feel a lot easier now after you’ve read the article.